Thursday, April 11, 2013

How To Temporarily Disable Your Anti-virus, Firewall And Anti-malware Programs


Register a free account to unlock additional features at BleepingComputer.com
Welcome to BleepingComputer, a free community where people like yourself come together to discuss and learn how to use their computers. Using the site is easy and fun. As a guest, you can browse and view the various discussions in the forums, but can not create a new topic or reply to an existing one unless you are logged in. Other benefits of registering an account are subscribing to topics and forums, creating a blog, and having no ads shown anywhere on the site.

Click here to Register a free account now! or read our Welcome Guide to learn how to use this site.

Photo
* * * * - 10 votes

How To Temporarily Disable Your Anti-virus, Firewall And Anti-malware Programs


  • Please log in to reply
111 replies to this topic

#1 quietman7

    Bleepin' Janitor
  • Global Moderator
  • PipPipPipPipPipPip
  • 25,975 posts
  • Gender:Male
  • Location:Virginia, USA
Posted 30 October 2007 - 09:44 AM
Quote
During the process of removing malware from your computer, there are times you may need to use specialized fix tools. This is especially true if you are receiving help from a member of the HJT Team. Certain embedded files that are part of these specialized fix tools may at times be detected by your anti-virus or anti-malware scanner as a "RiskTool", "Hacking tool", "Potentially unwanted tool", a virus or a "Trojan" when that is not the case.

These tools have been carefully created and tested by security experts so if your anti-virus or anti-malware program flags them as malware, the detection is what's known as a "False Positive". Anti-virus scanners cannot distinguish between "good" and "malicious" use of such programs, therefore they may alert you or even automatically remove them. In these cases, the removal of these files can have "unpredictable results" and unintentional results.

To avoid any problems while using a specialized tool it is very important that you temporarily disable your anti-virus and/or anti-malware programs before using them or when instructed by a member of the HJT Team. You can re-enable these programs after the malware removal process has been completed.

Many folks may not be sure how to do this so the BC Staff has created a list of common anti-virus programs and the relevant steps to disable their Real-time protection capabilities. When your system has been cleaned or when advised by your helper, it is important that you re-enable your security programs to avoid re-infection. A special thanks to Yourhighness for the diligent effort in compiling this list.


How to Temporarily Disable your Anti-virus


AVAST
Right- click on the avast! icon in system tray (looks like this: Posted Image but orange in color starting with v5). Select avast! shields control and there will be options to disable avast for 10 minutes, 1 hour, until the computer is restarted or permanently.

AVG 8
Open the AVG 8 Control Center, by right-clicking on the AVG 8 icon on task bar.
  • Click on Tools.
  • Select Advanced.
  • In the left hand pane, scroll down to "Resident Shield".
  • In the main pane, deselect the option to "Enable Resident Shield."
  • To re-enable AVG 8, please select "Enable Resident Shield" again.
AVG 8.5
Please open the AVG 8.5 Control Center, by right clicking on the AVG icon on task bar. AVG 9.0
Please refer to the instructions provided in AVG FAQ 2429: How to temporarily disable AVG Free Edition 9.0.

AVG 2011
Open the AVG 2011 Control Center, by right-clicking on the AVG icon on task bar.
  • Click on Open AVG User Interface.
  • On the Menu Bar, click on Tools, then click Advanced Settings.
  • In the screen which opens, scroll down to Temporarily disable AVG protection.
  • Click on it to highlight and in the right hand pane, check the box for Temporarily disable AVG protection.
  • Click Apply.
  • In the next screen which opens, select 15 minutes from the drop down menu, then click the Disable real time protection button and click OK.
  • To re-enable, just check Enable on the main GUI interface. You may also need to click Fix (enable becomes Fix if all components do not start).
AVG FAQ 3857: Disabling AVG 2011 temporarily
AVG FAQ 3902: Disabling Specific AVG components

AVIRA ANTIVIR
Please navigate to the system tray on the bottom right hand corner and look for an open white umbrella on red background (looks to this: Posted Image )
  • right click it-> untick the option AntiVir Guard enable.
  • You should now see a closed, white umbrella on a red background (looks to this: Posted Image )
BIT DEFENDER
  • Double click on the system icon for Bit Defender.
  • When the Bit Defender window appears, move mouse arrow to the left side and click >> Virus Shield.
  • Move mouse arrow to the black check by Virus Shield is enabled and click.
  • The black works will change to red, >> Virus Shield is disabled.
  • Move mouse arrow to the top right corner and click the down arrows.
  • Bit Defender is now inactive.
  • To enable Bit Defender, do the same steps except click to enable.
CA Internet Security Suite 2010
  • To turn off the Firewall, right-click on the CA Shield icon in the system tray, click My Internet, then click Disable Firewall.
  • To turn it back on, right click system tray icon, click My Internet, then click Enable Firewall.
  • To temporarily disable the Antivirus, right-click the CA Shield icon in the system tray, click My Computer, then click Enable Snooze.
  • Enter the snooze time in minutes (up to 999, approx 16 2/3 hours) in the box and click Snooze.
  • To end snooze, follow the same procedure and click Wake Now on the page for entering snooze time.
  • To disable Antivirus on a longer basis, double-click the CA Shield icon in the system tray.
  • When Security Center comes up, click Update Settings in the My Computer tab.
  • Then click the red X next to Auto Scan.
  • To re-enable, follow the same procedure and click the green checkmark.
ESET NOD32 ANTIVIRUS V4
  • Double click on the system tray icon: Posted Image on the bottom right hand corner.
  • Select Disable real-time file system protection.
  • A popup will ask "Are you sure you want to disable...protection?"
  • Click "Yes" to disable the Antivirus guard.
ESET SMART SECURITY
  • Double click on the system tray icon: Posted Image to open the main application window.
  • Or via Start >> All Programs >> ESET >> ESET Smart Security.
  • Click on Setup >> Antivirus and antispyware >> Temporarily disable Antivirus and antispyware protection.
  • When prompted to confirm temporarily disable select Yes.
  • Note: Protection will be automatically started after a system reboot.
F-SECURE ANTIVIRUS
Please navigate to the system tray on the bottom right hand corner and look for a blue Posted Image sign.
  • right click it-> select Unload.
  • The F-Secure sign should now be surrounded by a red striked through circle (looking like this: Posted Image )
F-SECURE CLIENT SECURITY
Please refer to this User Guide (page 67, Real-time scanning settings}

KASPERSKY ANTIVIRUS
Please navigate to the system tray on the bottom right hand corner and look for a Posted Image sign.
  • right click it-> select Pause Protection.
  • click on -> By User Request
  • a popup will claim that protection is now disabled and a sign like this: Posted Image will now be shown.
MCAFEE ANTIVIRUS
Please navigate to the system tray on the bottom right hand corner and look for a Posted Image sign.
  • Right-click it -> chose "Exit."
  • A popup will warn that protection will now be disabled. Click on "Yes" to disable the Antivirus guard.
MCAFEE SECURITY CENTER 7.1
Please navigate to the system tray and double-click the taskbar icon to open Security Center.
  • Click Advanced Menu (bottom mid-left).
  • Click Configure (left).
  • Click Computer & Files (top left).
  • VirusScan can be disabled in the right-hand module and set when it should resume or you can do that manually later on.
  • Do the same via Internet & Network for Firewall Plus.
Instructions to disable McAfee Security

MICROSOFT SECURITY ESSENTIALS
  • Open MSE and go to Settings > Real Time Protection.
  • Then uncheck "Turn on real time protection".
  • Exit MSE when done.
NORTON ANTIVIRUS (by Symantec)
Please navigate to the system tray on the bottom right hand corner and look for a Posted Image sign.
  • right-click it -> chose "Disable Auto-Protect."
  • select a duration of 5 hours (this assures no interference with the cleanup of your pc)
  • click "Ok."
  • a popup will warn that protection will now be disabled and the sign will now look like this: Posted Image
NORTON 360
  • Right-click the Norton 360 Premier Edition icon in the system tray and select Disable Antivirus Automatic-Protect.
  • You will get a new dialog box with five options: 15 minutes, 1 hour, 5 hours, Until system restart, Permanently.
  • Choose 5 hours.
NORTON INTERNET SECURITY 2008
Please refer to these instructions.

NORTON ANTIVIRUS CORPORATE EDITION
Please refer to the instructions provided in the Norton AntiVirus Corporate Edition User's Guide under the section Turning File System System Protection off temporarily.

Saturday, February 16, 2013

बिना सोफ्टवेयर के फोल्डर को लोक करने का आसान तरीका

बिना सोफ्टवेयर के फोल्डर को लोक करने का आसान तरीका


सबसे पहले तो आप एक फोल्डर बनाये किसी भी drive में___
उदहारण के लिए :- आपने एक फोल्डर अपने "E" Drive में "mayank" के नाम से बनाया जिसका Path नीचे दिया गया हैं,
E:\mayank अब आप नीचे दिए गए निर्देशों का पालन करते जाए :-
1) सबसे पहले आप अपना notepad खोले और उसमें
ren mayank mayank.{21EC2020-3AEA-1069-A2DD-08002B30309D}
ऊपर दिया गया कोड कॉपी करके पेस्ट करे.
2) और अपने जिस drive में "mayank" नाम का फोल्डर बनाया था उसी drive में आप अपनी इस notepad को "loc.bat"
के नाम से save करे.
3) अब आप एक और notepad खोले और उसमें नीचे दिया गया कोड कॉपी करके पेस्ट करे :-
ren mayank.{21EC2020-3AEA-1069-A2DD-08002B30309D} mayank
4) और एक बार फिर उसी drive में इसे "key.bat" के नाम से save करे, जिस drive में आपने "mayank" नाम का फोल्डर
बनाया था.लीजिये आपका काम हो गया, अब जो "फाइल" या "फोल्डर" या कोई और चीज जो आप दुसरो से छिपाना चाहते हैं
उसे "mayank"नाम वाले फोल्डर में डाल दे. और इसे lock करने के लिए "loc" वाले आइकन पे क्लिक कर दे. और अगर
दुबारा इसे unlock  करने के लिए "key" वाले आइकन पे क्लिक कर दे.
और आप किसी भी नाम से फोल्डर बना सकते हैं "mayank" तो समझाने के लिए इस्तेमाल किया था.
जरूरी जानकारी ( इस trick से फोल्डर lock नही होता बल्कि जब आप "lock" वाले आइकन पे क्लिक करते हो तो उससे वो
फोल्डर आपके PC की एक Option वाला एक शार्टकट बन जाता हैं और "Key" वाले आइकन पे क्लिक करने से फिर आपका
फोल्डर सामान्य हो जाता हैं.)

Sunday, January 13, 2013

How to make Bootable Windows XP PenDrive

Boot from USB is more faster than boot from CD Drive. You can easily install Windows XP from a Pen drive by making your Pen Drive Bootable. Here is the process to make Bootable Pen Drive.


To make bootable windows xp pendrive please visit www.emdadblog.com From now I am available to this site and you will get all the replay and update blog post at this site. This blog site emdadblog.blogspot.com will no longer be updated. 


Thanks


Emdad


First Download this USBMultiboot10.zip

You must do


  • Unzip the file after downloading 
  • A folder will be created as "USB-Multiboot_10"
  • Now insert your minimum 1 GB pen drive into USB port

Note : Make sure that you have Backup your data from Pen drive. Because your Pen Drive will be  formatted during making bootable pen drive process.


Now follow this steps :


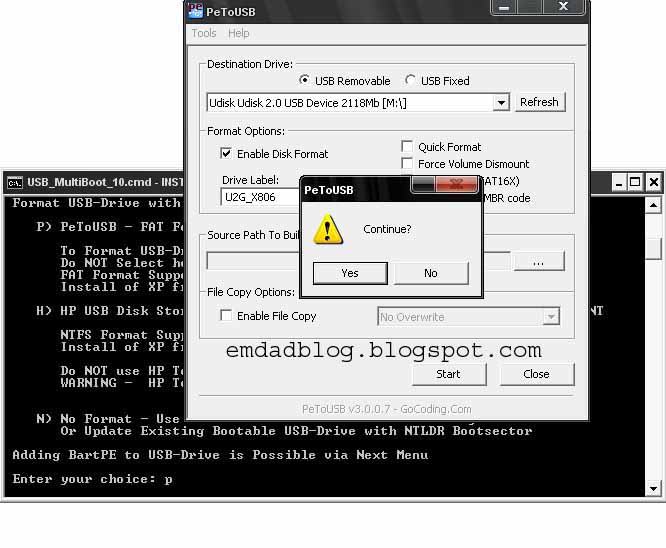
  • Open USB_Multiboot_10.cmd from USB_multiboot_10 folder
  • Press any key to Continue... A message will be appear. Press ENTER
  • From Enter your choice : type P and press ENTER
  • Now  Pen derive format option will come and format your pen drive. See below pictures...

Bootable Windows Xp Pendrive

  • Now insert your XP CD in your CD Rom
  • Type 1 and press ENTER in Enter your choice
  • Locate the XP CD installation Disk
  • Choose YES when unattended install option appear

Now insert the below information on by one and press OK


  1. Owner Name = emdadblog (Your Name)
  2. Organization Name = Emdadblog(Your Name)
  3. Product Key = XXXXX-XXXXX-XXXXX-XXXXX-XXXXX(your Xp serial Key)
  4. Computer Name = Emdadblog(your computer name)
  5. Administrator Password = XXXX(Your password)
  6. Time Zone = Your time zone
  7. Workgroup Name = Emdadblog(Your name)
  8. User Name = Emdadblog(Your name)
Now press OK
  • Type 2 and press ENTER in choice 2
  • Now locate your pen drive location
  • Type 3 and press enter
  • Now the process will continue to make bootable XP Pen drive
Note : During the installation process never disconnect the pen drive from USB port until the first time windows desktop appear.

In many computer during the installation process after restarting first time a error hall.dll will come. In this situation  to boot from pen drive choose "2.and 3. Continue with GUI mode setup Widnows XP + Start XP from HD 1" from boot menu option and press  ENTER

Saturday, December 15, 2012

अपने कंप्यूटर को सुधारे आसानी से

अपने कंप्यूटर को सुधारे आसानी से


कितनी ही बार हम कंप्यूटर की खराबियों से अपना कीमती वक्त और डाटा गवां देते है पर कंप्यूटर की खराबियों को ठीक करने बस फॉर्मेट करना ही एकमात्र विकल्प नहीं होता ।
एक छोटा मुफ्त पोर्टेबल टूल जो आपके कंप्यूटर को ठीक करने में आपकी मदद करेगा ।


इस टूल का नाम है Windows Repair और ये अपने नाम के अनुसार आपके विंडोज को रिपेयर करता है ।

इसमें आप 5 आसान चरणों में अपनी कंप्यूटर की समस्याओ को ठीक कर सकते हैं ।

पहले चरण में आपको वायरस आदि से आई खराबियो के लिए टूल डाउनलोड करने कहा जाएगा आप अगर कोई अच्छा एंटी वायरस पहले से ही उपयोग कर रहें है तो इस चरण को उपयोग ना करके सीधे दुसरे चरण से शुरुआत कर सकते हैं ।

दुसरे चरण में Disk Check , तीसरे में System File Check , चौथे चरण में System Restore Point Create/Restore करने कहा जाएगा (इस System Restore Point Create चरण में करना सुरक्षा के लिहाज से जरुरी है ) ,
चरण में Basic, Advanced या Custom mode के जरिये आपके कंप्यूटर को सुधारा जाएगा । आप इनमें से अपनी सुविधा के अनुस्सर एक विकल्प चुन सकते हैं । इस प्रक्रिया के बाद अगर आप विंडोज एक्सपी का उपयोग कर रहे है तो सुधार की प्रक्रिया के दौरान विंडोज एक्सपी की सीडी की जरुरत हो सकती है इसलिए विंडोज एक्सपी की सीडी तैयार रखें । विंडोज विस्टा या सेवन में आपको सीडी की जरुरत नहीं होगी ।


कंप्यूटर फोर्मेट करने से पहले एक आखिरी औजार के रूप में इसका उपयोग जरुर करें । चूँकि ये पोर्टेबल टूल है इसलिए सेफ मोड़ में भी बिना इंस्टाल किये इसका उपयोग किया जा सकता है ।


सिर्फ 1.2 एमबी आकार का मुफ्त उपयोगी औजार ।


Wednesday, December 12, 2012

डिलीट हो गई फाइल्स को रिकवर करे

अगर गलती से आपकी फाइल्स डिलीट हो गई हो या पूरा ड्राइव फॉर्मेट हो गया हो तो घबराने की जरुरत नही ये सॉफ्टवेर आपकी फाइल्स वापस कर देगा ।


चूंकि ये पोर्टेबल है तो इंस्टाल करने की भी जरुरत नही पेन ड्राइव पे रखिये । रिकुवा से तो बहुत बेहतर है ।


यहाँ क्लिक कर डाउनलोड करे


डाउनलोड करे बिल्कुल मुफ्त है।

राईट क्लिक से खोले मनचाहा प्रोग्राम

राईट क्लिक से खोले मनचाहा प्रोग्राम

 अपने राईट क्लिक मेनू से खोलिए कोई भी प्रोग्राम इस १०० के बी के छोटे से मुफ्त टूल से । बस थोडी सेटिंग कीजिये की कौन कौन सा प्रोग्राम लगाना चाहते है ।


डाउनलोड करने यहाँ क्लिक करे ।

Thursday, November 15, 2012

मदर बोर्ड के ड्राइवर फ्री में डाउनलोड करने का सबसे आसान तरीका

मदर बोर्ड के ड्राइवर फ्री में डाउनलोड करने का सबसे आसान तरीका

मेने अपनी पिछली पोस्ट में मदर बोर्ड के ड्राइवर डाउनलोड करने वाले सोफ्टवेयर के बारे में बताया था जिसे आप यहाँ क्लीक करके देख सकते है। लेकिन बहुत से लोगो को ये सोफ्टवेयर समझ में नहीं आया तो सोचा इस बार आप लोगो को ऐसी जानकारी दू की आप बिना सोफ्टवेयर की साहयता के मदर बोर्ड के ड्राइवर डाउनलोड कर पाओ।

कभी कभी कंप्यूटर में खराबी आने के कारण हमे विंडोज को फॉर्मेट करना होता है फॉर्मेट करने के बाद विंडोज में सब सोफ्टवेयर दुबारा से डालने होते है। लेकिन जो सबसे मेन सोफ्टवेयर होता है वो है, आपके कंप्यूटर के ड्राइवर यानि साउंड ड्राइवर, विडियो ड्राइवर आदि वेसे तो अधिकतर सबके पास ही मदरबोर्ड के ड्राइवर की सीडी होती है। लेकिन अगर आपके पास ड्राइवर की सीडी नहीं है, तो निचे दिए गये तरीके को अपनाए और चुटकियो में अपने मदर बोर्ड के ड्राइवर डाउनलोड करे वो भी फ्री में।

जब आपके सिस्टम में ड्राइवर नहीं होता तो अधिकतर सिस्टम में उस ड्राइवर पर पीले रंग का आईकन बना होता है। अगर आप अपने मदर बोर्ड के ड्राइवर डाउनलोड करना चाहते हो तो सबसे पहले आप माई कंप्यूटर पर राईट क्लीक करके प्रोपर्टी पर जाए फिर Hardware+Device Manager पर क्लीक करे। अब आपको कोई सा भी ड्राइवर चाहिए उस पर राईट क्लीक करके प्रोपर्टी पर क्लीक करे।

इसके बाद जो विंडो खुलेगी उसमे ऊपर की साईट आपको चार ओपशंस दिखाई देंगे। वह आपको Details पर क्लीक करके Device instance id पर क्लीक करना है Device instance id पर क्लीक करने के बाद आपको निचे बॉक्स में एक आईडी दिखाई देगी जेसा आप निचे चित्र में देख रहे हो।
अब माउस से उस आई डी पर क्लीक करे और किबोर्ड से कंट्रोल C दबा कर उस आई डी को कॉपी करे फिर इस साईट पर आकर उस आई डी को सर्च बॉक्स में पेस्ट कर दे

आई डी सर्च करते ही आपके सामने डाउनलोड का लिंक आ जायेगा जिसे आप क्लीक करके फ्री में डाउनलोड कर सकते हो और उसे अपनी हार्ड डिस्क या सीडी में भी सेव रख सकते है ताकि आगे जरुरत पड़ने पर वो आपके काम आ सके

अपने इन्टरनेट को कीजिए तेज मुफ्त DNS से

अपने इन्टरनेट को कीजिए तेज मुफ्त DNS से


अपने इन्टरनेट को थोडा तेज बनाने और ब्लॉग/वेबसाइट न खुलने जैसी समस्याओं को दूर करने का एक अच्छा विकल्प है अपने कंप्यूटर में इन्टरनेट सेवा प्रदाता के DNS को बदलकर मुफ्त तेज बेहतर DNS लगाना .


5 प्रमुख मूफ्त तेज और सेवाए जो आप अपने कंप्यूटर में लगा सकते हैं वो हैं


1. Google DNS : -
        8.8.8.8
        8.8.4.4

2. Open DNS :-
        208.67.222.222
        208.67.220.220

3. Norton DNS :-
        198.153.192.1
        198.153.194.1

4. Scrub IT :-
        67.138.54.100
        207.225.209.66

5. DNS Advantage :-
         156.154.70.1
         156.154.71.1


----------------------------------------------------------------------------------------------------


अब  देखते हैं की अपने कंप्यूटर में DNS  कैसे बदलें -

 सबसे पहले अपने कंप्यूटर में कंट्रोल पैनल में जाइये
1- अगर आपके कंप्यूटर में विंडोज एक्सपी है तो  
पहले  Network and Internet Connections फिर Network Connections पर जाइये
यहाँ अपने वर्तमान कनेक्शन पर राईट क्लिक करें और Properties  विकल्प का चुनाव करें .
यहाँ Internet Protocol (TCP/IP),पर और उसके बाद  Properties पर क्लिक करें
एक नयी विंडो खुलेगी इसमें नीचे के खंड में आपको दो विकल्प दिखाई देंगे
Obtain DNS server address automatically और Use the following DNS server addresses
इसमें Use the following DNS server addresses का चुनाव करें .
अब Preferred DNS server और  Alternate DNS server में अपनी पसंद के DNS  लगा दें . .
जैसे 8.8.8.8
और 8.8.4.4 .


2 - विंडोज 7 के लिए 
कंट्रोल पैनल से Network and Internet फिर  Network and Sharing Center फिर  Change Adapter Settings पर जाएँ .

अब अपने वर्तमान Local Area Connection या  Wireless Network Connection पर राईट क्लिक करें और  का Properties विकल्प चुने .
यहाँ Networking tab में  Internet Protocol Version 4 (TCP/IPv4) पर डबल क्लिक करें .
एक नयी विंडो खुलेगी इसमें नीचे के खंड में आपको दो विकल्प दिखाई देंगे
Obtain DNS server address automatically और Use the following DNS server addresses
इसमें Use the following DNS server addresses का चुनाव करें .
अब Preferred DNS server और  Alternate DNS server में अपनी पसंद के DNS  लगा दें . .
जैसे 8.8.8.8
और 8.8.4.4 .


 अब आपके  कंप्यूटर पर इन्टरनेट कुछ प्रतिशत तेज होगा साथ ही  ब्लॉग नहीं खोल पा रहे? जैसी समस्याओं से निपटने में भी मदद मिलेगी .

Thursday, November 8, 2012

Trick to Show ur name after time in taskbar...

Start -> Control Pannel -> Regional and LAnguage option -> Customize (beside English US) -> Go to TIME tab -> Change AM symbol and PM symbol from AM and PM to ur name -> Apply -> Ok ...
IS it changed ??? Might be not ...Now go to time in taskbar and Double Click it to open "Date and time property" ...Look place where time chnges in digital form i.e. 02:47:52 AM , click to arrow to cnage the AM or PM by selecting and press arrow. It will Show ur name or name that was entered by u, Apply -> OK and be HAPPY 8)

Error Reporting in XP


If error reporting in XP is bugging you then turn it off.


When a system error occurs in XP, a little dialog box appears asking if you want to report the error to Microsoft. Click the message box to make it disappear. You don't have to report the error if you don't want to and on today's "Call for Help" Leo shows you how to turn off the feature if you find it distracting.

To disable error reporting, follow these directions:

1. Right-click My Computer and choose Properties.
2. Click the Advanced tab on your System Properties dialog box.
3. Click the Error Reporting button on the Advanced tab.
4. Place a checkmark next to "Disable error reporting."
5. Leave the other radio button unchecked next to the text labeled, "But notify me when critical errors occur."
6. Click OK.

Wednesday, November 7, 2012

छोटा और उपयोगी फोटो एडिटर


अगर आपको भारी भरकम फोटोशोप का विकल्प चाहिए तो ये औजार आपके काम आएगा ।
एक फोटो एडिटर जो फोटोशोप जितना अच्छा नही है पर अगर आपको बहुत ज्यादा फोटो एडिटिंग और उन पर इफेक्ट देने की जरुर ना हो तो आप ये 10 एमबी का फोटो एडिटर इस्तेमाल करें ।

इस औजार लगभग सभी मुख्य एडिटिंग टूल तो है ही इसमे साथ ही एक ख़ास टूल है जो फोटोशोप में नही है ।
फोटो की साइज़ बड़ी करने पर उनमे डस्ट या दाने आ जाते है जिससे फोटो ख़राब दिखने लगती है उसे दूर करने इसमे डस्ट रिडक्शन टूल है बस एक क्लिक और थोड़ा सा व्यवस्थित कर आप अपनी फोटो को स्मूथ कर सकते है खासकर मोबाइल से ली गई फोटो को ।

इस औजार का आकार है १० एमबी ।

Tuesday, November 6, 2012

How to create a System State data backup?


Using System State backup technique, you can create the backup of windows critical components on any system drive and this backup file can be used if the original copy is lost, damaged, or destroyed. On windows 2000/XP/Vista, system state data wizard backed up the following components.

Windows registry

Windows boot file

COM+ class registration database 


But if you are running domain controller, system state data wizard backed up the following components.

Active Directory
System volume (SYSVOL)
Windows registry
Windows boot files
COM+ class registration database     

Follow the given steps to run System State data backup wizard:
To use this feature, you will need to be logged into your computer with administrative rights. 
First click on Start button> All programs> Accessories> System Tools then click on Backup.
Now by default backup wizard will start, click on advanced mode option to change the backup settings.
Here a dialog box will appear with title "Backup Utility", select "Welcome" tab and click on Backup Wizard [Advanced] button to create backup of windows important components.  
Click on Next button to continue backup wizard.
Now select option "Only back up the System State date" on what to back up page and click on Next button.
Here click on Browse button to specify the destination for backup file and also set backup file name under "Type a name for this backup" box then click on Next button. 
Now verify your selected settings and click on Finish button to start backup process.
   

How to add new destinations to "Send To" menu in windows XP?


In windows environment, the Send To command is used to transfer files from one location to different locations. By using this command, a user can quickly send his file between default destinations (default lists in Send To menu, for example Desktop, CD/DVD Drive, My Documents, Mail Recipient and Floppy Drive). These are the default Send To menu lists in windows XP. To increase the data transfer speed between different locations, you can add more new destination in Send To lists. 
Follow the given steps to add new destinations to Send To lists: 


First click on Start button and type sendto in Run option then press Ok button.
A window will appear with default Send To lists (Compressed (zipped) Folder, Desktop (create shortcut), Mail Recipient, My Documents). 
Now using drag-and-drop technique (or using copy and paste method), you can move any program, folders and drives shortcuts to this folder.
Now you can verify, your new shortcut is created in Send To menu.
But next times, if you want to delete any destination, then open the Sent To folder and remove the destination shortcut.